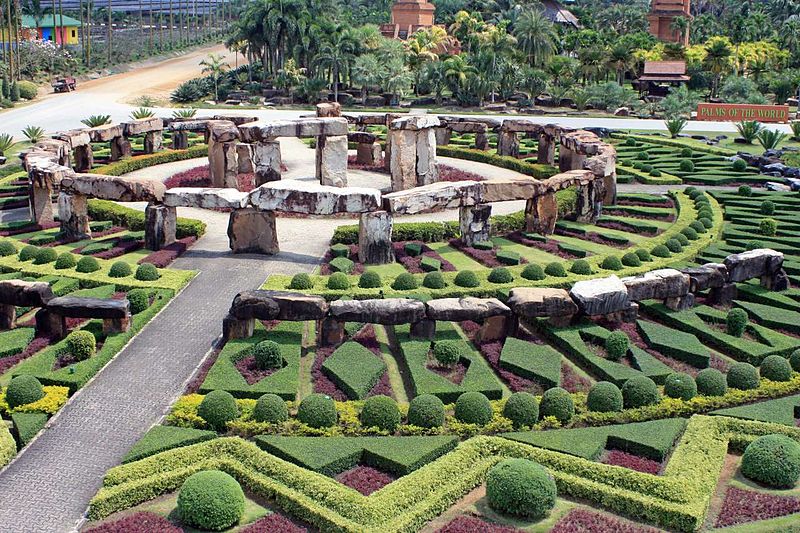
Designing a Stonehenge Garden
Have you ever wondered what practical use you can give all of those long shaped rocks that show up from time to time in your yard and in the woods nearby? Sure, they can be used to decorate any garden or front yard, but then so can lots of other rocks. If you have one of those longish shaped rocks hanging around, find it, look at it, then turn it on one end. It could pass for a column, but certainly not a Greek Ionic one. It does look like one that might be found at that famous site in Wiltshire, England, known as Stonehenge. You probably won’t get people from all over the world viewing a miniature Stonehenge in your yard, but you are sure to attract the attention of your neighbors and maybe even the local newspaper.
You don’t need to have a lot of long shaped rocks for this project. Your Stonehenge circle can be anywhere from 18″ to 20″ or more in size, depending on how many rocks are available that you can find. The rocks can be of any texture and color. For some diversity, throw in a few cement bricks that are approximately the same height as the rocks. Aim between rocks that are 16″ to 20″ long. If each rock has one end more narrow than the other, then you are in luck: these will be the easiest to stick into the ground, as will the other stones be placed. Mark out the area where you will be assembling your Stonehenge. You can also consult an online photo of the real Stonehenge to get an idea of what it looks like. Next, seek out some smaller stones that are more flat shaped. All you need is a handful, between four and five. These will be placed on top of several pairs of upright rocks.
Mark out on the well turned, dirt ground with a stick a circle. The rocks do not have to be placed too close together, for you want to allow enough room to walk in between them to get to the center. 8″ to 10″ is wide enough a walking space in between the rocks. The only ones that will be slightly closer together are those pairs that will have a third rock laying across the top of them. As a tip, select those long rocks with a flat, level end that will hold the third rock on top in place.
Dig a hole in each spot where one rock will be sitting on one end. Make sure the dirt is packed tightly enough at the base of each rock. Choose the pairs that you want to have the third rock on top, and set the rocks on top. It will look more rustic if the top rocks are placed randomly throughout your circle.
Once the rocks are all in place, now you are ready to begin planting. I like the low growing flowers that can be placed in between the upright rocks. The only spaces that will be open is the path to the center. Pansies are perfect, as are alyssum, impatiens, ageratums, bachelor’s buttons, and nasturtiums. For the center of your Stonehenge garden, there are several different items you can stick there. If space allows, stick a birdbath there with a small garden sculpture next to it. In a smaller center space, plant a clump of tall flowers, like the large snapdragons, lupines, or foxgloves. Or you can try a flowering bush, like an azalea. After planting your flowers, water the Stonehenge garden well. Keep it regularly maintained by removing weeds on a weekly basis, and add fertilizer at least twice during the growing season. Don’t forget to take snapshots of your Stonehenge and send them to everyone you know. Soon they will want to make their own Stonehenge gardens, too.
Image Credit: Aleksasfi, CC BY-SA 4.0, via Wikimedia Commons.